E-bike expert shares the real gear he uses daily after two decades of testing

Summary
A veteran e-bike reviewer with nearly 20 years in the industry reveals the accessories he personally relies on for commuting, exercise, and family transportation. His picks range from premium ART-certified locks to budget items under $5, based on real-world use rather than lab tests.
I’m in the somewhat unusual position of basically riding electric bicycles for a living. I’ve been working with e-bikes for nearly two decades, professionally covering the e-bike industry for most of that time, testing hundreds of different models and traveling around the world to ride new e-bikes in some pretty incredible places. Yeah, it’s a tough job – but someone’s got to suffer it.
Of course I don’t just ride e-bikes for work. I ride them recreationally. I ride them for exercise. I ride them for transportation. My family doesn’t even own a car, meaning two wheels handle the vast majority of our transportation.
In other words: I talk the talk and I walk the walk. Or perhaps more accurately, I ride the ride.
And while most of the time all you really need for a good ride is an e-bike and a direction to go in, there are a handful of pieces of gear that I’ve come to rely on over the years. Some keep me safer. Some keep my bikes out of the hands of thieves. Some make rides more comfortable or convenient. And some are just neat little things that I’ve discovered along the way.
This isn’t a list of every bike accessory I’ve ever tested, nor am I saying these are necessarily the absolute best products in every category. These are simply the things that I actually use. Some are a bit pricey, some are dirt cheap (several pieces of gear below are under $5!), but they’re all things I personally rely on and that I recommend to my friends and family. And now, to you.
Seatylock’s FoldyLock Forever and Mason 220
If you own nice e-bikes, you’re eventually going to spend a lot of time thinking about locks. Your lock may even be your most important accessory. Or perhaps I should say “accessories”, because the best way to ensure your e-bike is still there when you get back is to use more than one solid lock.
My go-to options that I grab basically every day for the last couple of years have been Seatylock’s FoldyLock Forever folding lock and Mason 220 U-lock.
For reference, the Foldylock Forever is the world’s strongest folding lock. That’s not just their marketing speak, but rather it’s confirmed by independent testing and certification. It’s the only folding lock in the world to achieve an ART 3-star security rating awarded by the Stichting ART Foundation, an independent Dutch organization that tests and certifies anti-theft locks. It earned that certification three years ago, and no other folding lock has been able to reach that level yet. The only higher ratings ART gives are for locks rated for motorcycles.


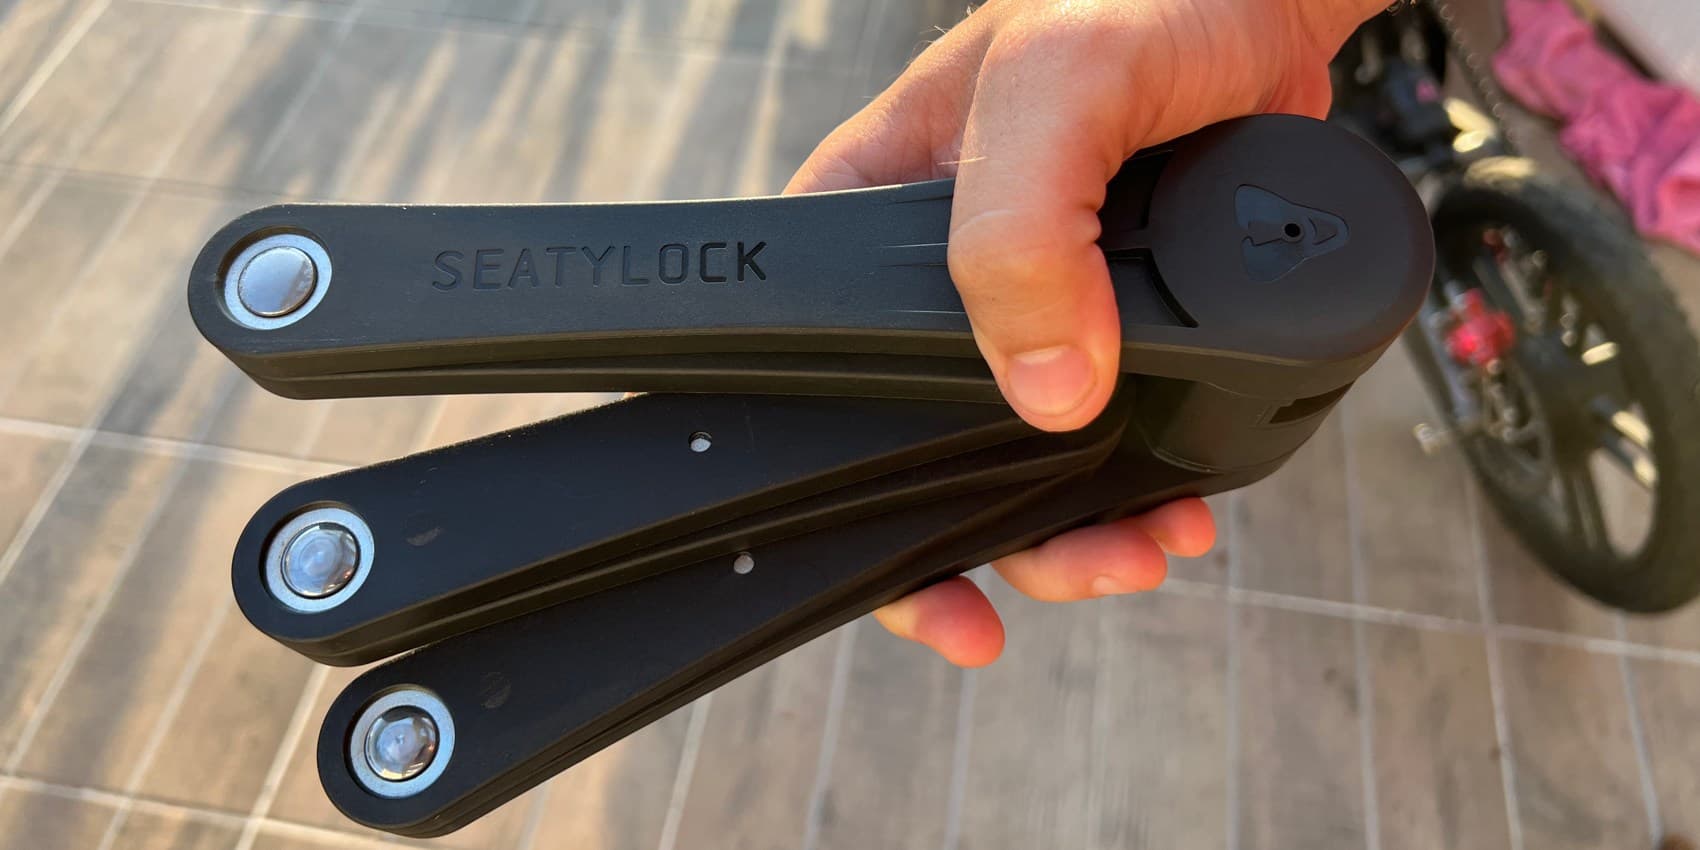
Personally, I like folding locks because they pack relatively neatly on the bike while still giving me enough flexibility to work around different racks and poles, or even larger things like trees.
The FoldyLock Forever is the one I reach for when I want serious security matched with more flexibility, while the Mason 220 gives me another beefy option when I know a U-lock will fit what I’m locking to.
The Mason is great as a strong U-lock, but I also like how large it is, letting me lock to wider poles and also a tad bit farther from the pole itself, leaving room for pannier bags and other things that get in the way. Amazingly, it’s also one of the few U-locks I have that can fit over the beefy battery-filled downtube on most of my e-bikes.


I also use the smaller FoldyLock Compact when I want something easier to carry and don’t need quite as much lock.
It’s more affordable and lighter, though it doesn’t have quite the same security level as the bigger and beefier options above.
The Compact does have one other advantage, though: it comes in all sorts of bright colors and even a rainbow option where each link is a different color. That might not be a huge security concern, but it’s fun when you can choose a color to match your bike or mood!


No bike lock makes a bicycle theft-proof. Given enough time and the right tools, a determined thief can defeat virtually anything. The idea is to make your bike enough of a pain in the butt to steal that the thief decides someone else’s bike looks easier. And if they still want your bike (because let’s face it, you’ve probably got an awesome e-bike), then the multiple locks better be good ones so its takes them long enough that they eventually give up.
I also covered Seatylock’s upcoming angle grinder-proof U-locks that I saw at the Milan Motorcycle Show, so I’ll likely switch to those once they come out this Spring. They’re designed to keep motorcycles safe, and come in two sizes: one for motorcycles and a smaller one for bikes.
UNIT 1 helmets
Let’s continue with what may actually be the most important piece of gear for an e-biker: a helmet.
I’ve tested plenty of helmets over the years, but lately I’ve been gravitating toward UNIT 1’s helmets. They’re comfortable, they look good, and I appreciate the extra safety features beyond simply putting a layer of impact protection around my skull.
I particularly like having integrated lighting built right into my helmet, putting lights up high where they’re easier for drivers to see. On models like the FARO, I also appreciate the inclusion of MIPS as well as the handlebar-mounted remote for activating the helmet’s turn signals.


I recently started using UNIT 1’s NEON helmet too, which is lighter and has a really slick magnetic face shield. You barely have to line the shield up; get it close enough and the magnets practically snatch it out of your hand and put it into place. It’s clear enough for night riding but darkens in bright sunlight, and the helmet is rated for faster 28 mph e-bike riding.
There are cheaper helmets out there, of course, but considering how much time I spend on two wheels, a good helmet is one area where I don’t mind spending a bit more.
You can actually see the FARO helmet in the clip below, along with the TriEye glasses coming up next.

TriEye rear-view mirror glasses
TriEye glasses are another accessory that sounds a little gimmicky until you actually start using them. Sunglasses with a built-in rearview mirror? I was sure they were going to be a gimmick but they just looked too interesting to pass up, so I offered to test them out.
As it turns out, they’re now the first sunglasses I reach for when I’m riding. They really do work!
They have a tiny rear-view mirror integrated into the glasses, giving me a quick view behind me without having to turn my head all the way around.

It takes a little time to get used to looking into such a small mirror, but once your brain figures it out, it becomes surprisingly natural. I can quickly check what’s approaching from behind while still keeping most of my attention pointed forward.
It’s especially useful when riding on roads where I’m regularly interacting with traffic, though I still give an old-fashioned head check before making any major lateral move.
They’re $99, which isn’t bad for decent sunglasses, though you can get them for 10% off with the discount code EBIKE at checkout.
H2O Audio bone-conduction headphones
I love listening to music and podcasts while riding, but I’m not a fan of plugging my ears while sharing the road with cars.
That’s why I’ve become a big fan of H2O Audio’s bone-conduction headphones. They sit outside my ears and transmit sound through bone conduction, meaning my ears themselves remain open to the world around me. I’ve been testing out the new TRI ULTRA PRO model, and it’s pretty dang amazing! I can hear my music perfectly, but I can still hear all the road sounds, pedestrians, other cyclists, etc.

Of course, that doesn’t mean you can crank the music and magically retain perfect situational awareness. But at reasonable volumes, I can enjoy something in the background while still hearing cars, horns, bells and everything else happening around me.
For longer recreational rides especially, they’ve become one of those things I really appreciate having along. I’ve done rides as long as 3 hours with them and they haven’t felt cumbersome or made my ears sore, so the fit seems great for me.
Knog Oi Prima bell – and my cheap secret AirTag bell
I really like the Knog Oi Prima as a bike bell. It looks good, has a nice low-profile design and does what a bell is supposed to do without looking like you bolted a miniature doorbell onto your handlebars.
Despite its small size, it’s also super loud. And unlike the older ratcheting-style bells (krr-krr-krr-krrring), this is a single thumper, meaning I can ding once quickly for a polite “hello, I’m here!” or several hard and rapid DINGs for a “wtf do you think you’re doing, guy?!”
The bell absolutely disappears on my handlebars, which is good because there’s not much real estate left up there. Really, the only downside I can find is that it’s not cheap, at around $32 depending on current sales.


But I also have another favorite bell that costs a fraction as much.
I found cheap bike bells on AliExpress that have a hidden compartment for an Apple AirTag. From the outside, it just looks like a boring bike bell. Inside, it’s secretly helping me keep tabs on my bike.
And for $4, they’re a pretty awesome deal for a loud bell that hides a tracking device. Of course, you’ll have to fork over another $20 or so for the AirTag tracker, but your e-bike is certainly worth that much.
Which brings me to another part of my bike security strategy.


I hide multiple AirTags on my e-bikes
I don’t necessarily stop at one AirTag. One AirTag is for amateurs. I go with multiple. A four-pack is $79, or around half the cost of a solid e-bike lock.
There are all sorts of clever AirTag hiding accessories available now. In addition to the bell, I’ve used a $5 water bottle-style AirTag holder as well as an $8 rear reflector with a hidden AirTag compartment.
The reflector isn’t the most inconspicuous AirTag hider, but the water bottle holder definitely doesn’t scream “guess what’s actually inside of my molded plastic body!” And for added security, the water bottle holder is held on with Torx bolts. It’s not exactly a security key, but even if a bike thief carries hex wrenches with them, they’re unlikely to have Torx wrenches, meaning that the AirTag will stay on the bike a bit longer while it’s in the hands of a thief.


AirTags aren’t dedicated anti-theft GPS trackers, and Apple intentionally includes anti-stalking features that can eventually alert someone that an unknown AirTag is traveling with them. But I still think they’re a useful additional layer of security, especially because they’re cheap enough to use redundantly.
A bike thief might know enough to search for an AirTag and remove it. But are they going to keep searching after they find the first one? What about the second? Are they expecting three?
That’s the idea, anyway. And since I keep pretty good tabs on my e-bikes, I’ll know pretty quickly if one goes missing. From there, it’s a race between me getting to the thief and him finding all of my AirTags. Good luck, buddy.
Beyond Riders protective riding hoodie
I’m a big believer in wearing proper protective gear when riding faster electric two-wheelers, but I also don’t particularly want to look like I’m headed to a motorcycle race every time I leave the house. That’s one of the reasons I’ve really come to appreciate my Beyond Riders protective riding hoodie.
It looks and feels much like a regular casual hoodie, but it’s designed with motorcycle-style protection in mind, including abrasion-resistant materials and removable impact protectors. Believe it or not, there’s flexible CE Level 2 armor in there on the elbows, shoulders, chest, and spine.


I like that I can throw it on before a ride and get an extra layer of protection without having to wear a bulky motorcycle jacket. It’s particularly nice for faster e-bikes and electric mopeds, where the speeds are high enough that I’d rather have something more substantial than a regular sweatshirt between my skin and the pavement.
Of course, no protective hoodie is going to make a crash harmless, and I still choose my gear based on the type of riding I’m doing. But I love products that make it easier to incorporate safety into everyday riding without adding a bunch of hassle. If protective gear is comfortable, convenient, and looks good enough that I actually want to wear it, that’s a big win in my book.
Tannus tire liners
Tannus tire liners are perhaps one of the less exciting products on this list, right up until they save you from fixing a flat on the side of the road. And then they’re the one thing on this list you’ll be ready to open-mouth kiss.
I’ve used Tannus products for years as an extra layer of flat protection, and I’m a big believer in them.
No tire protection system is going to prevent every possible flat, but anything that reduces my chances of sitting on the side of a road pulling a wheel off an e-bike is worth considering.
That’s particularly true with e-bikes, where hub motor wheels can be more complicated to remove thanks to heavy motors, annoying cables, clumsy torque washers, and other hardware.

Tannus tire liners are annoying to install, but you do it once and forget about it. Then you’re almost guaranteed to not get a flat.
And even if you do happen to get a 3″ nail going through it at the perfect angle, they serve as runflats so you can still ride home (albeit a bit slower and more carefully) instead of doing the walk of shame next to your bike.
Topeak Ratchet Stick
I don’t want to carry an entire bike shop with me, but I do want enough tools to deal with the common things that can happen during a ride.
The Topeak Ratchet Stick hits a nice sweet spot for me. It’s small enough that I’ll actually bring it along, yet useful enough for the various bolts and adjustments that tend to crop up on bikes.
All of the important bits fit right inside the handle, so I don’t have any extra sleeves or clips to keep tabs on.


This is exactly what I want from a ride tool: something small but effective. The giant tool kit sitting at home isn’t particularly useful when something starts rattling 20 kilometers away.
At $48, it’s not cheap. But I’ve had mine for around 6 years, and it’s still going strong, so at least it’s well made! At around 8 bucks per year, I’d call it a good investment.
A surprisingly good cheap bike pannier
This is one of my more recent cheap finds.
I picked up a waterproof-style pannier bag from AliExpress for around $25, and I’ve been surprisingly impressed with it.
It isn’t quite as big as the pannier I have from Priority Bicycles, but it still holds a useful amount of cargo and feels much nicer than I expected for the price.

I particularly like that there are two ways to close it. You can use it as a traditional roll-top pannier and clip the sides together, or you can use the strap that comes over the top when you have too much stuff in there to close it the normal way. I use that second option anytime I have my yoga mat in there since it sticks out the top, but I can still close it relatively tight to keep the mat from swinging around while riding. Depending on how much stuff I’m carrying and how I’ve packed it, having both options is quite convenient.
It’s not the fanciest pannier I own. But for around 25 bucks, it’s one of those cheap accessories that turned out to be much better than I expected.
$1 handlebar jacks are stupidly useful
These might have the highest usefulness-to-price ratio of anything here.
I bought a pair of tiny plastic handlebar jacks on AliExpress for barely more than a dollar. They clip onto the handlebars and provide little stands for when I need to turn a bicycle upside down.
Anyone who has ever flipped a modern e-bike over to change a tube knows the problem. Your handlebars are probably covered in displays, buttons, brake levers, bells, phone mounts and who knows what else. Turning the bike upside down means resting all of that expensive stuff directly on the ground.
You can loosen everything and rotate it out of the way. Or you can use two $1 pieces of plastic.

The jacks hold the handlebars slightly above the ground so my accessories don’t get scratched or crushed. Simple problem, simple solution.
If you have a 3D printer, you can probably just print your own version of these. There’s a rubber O-ring-style keeper on it, but you can probably just use a rubber band if you wanted to DIY these yourself.
My suspension dropper seatpost
Another recent addition has been a ZOOM suspension dropper seatpost that I installed on my Ride1Up Roadster V3.
I love the thing now that it’s installed. It gives me suspension to take some of the sting out of rough roads while also providing the convenience of a dropper post.

Getting it onto my particular bike, however, was another story.
It took me nearly two hours, largely because the Ride1Up Roadster V3 wasn’t set up for the internal cable routing I needed. I got the cable most of the way there through the downtube’s very narrow wire run, but then I ultimately ended up drilling a small hole in the seat tube to make the last bit of my installation work.
To be very clear: I do not recommend doing that.
Drilling holes in bicycle frames can compromise their structural integrity, void warranties and generally create problems you don’t want. As a mechanical engineer with a lot of bike experience, I was comfortable making that decision on my own bike because I knew exactly where the frame is least stressed, but it’s definitely not something I’d advise others to copy.
The lesson here isn’t “drill your frame.” It’s to check whether your bike is actually designed for an internally routed dropper post before ordering one. Had I done that first (basically by shining a flashlight down the empty seat tube and realizing there wasn’t a hole to access the bottom bracket), I could have saved myself quite a bit of trouble and just gotten a dropper post with an external cable run.
But now that it’s installed? I love it!
HOVERAir X1 Pro Max
And finally, here’s one that isn’t really normal bike gear at all, but that I LOVE bringing on my rides.
I spend a lot of time taking photos and videos of bikes, which presents an obvious problem when I’m both the cyclist and the photographer.
The HOVERAir X1 Pro Max has become one of my favorite solutions. It’s a tiny autonomous flying camera that can follow me around without requiring someone else to pilot it. I used the previous version of this drone for a while until this version came out, and then I immediately upgraded.

It folds down small enough that I basically forget that I even have it in my bag. Despite its small size, it still can automatically track and follow me, even at speeds of over 20 mph (32 km/h). That means I can pull it out during a ride, send it up (it takes off from my palm!) and get tracking shots that would normally require another person riding or running alongside me with a camera.
I especially like the Dolly Track mode, which can create some fantastic moving shots while automatically following me from the sides or the front, instead of just the boring old follow-behind-me drone shots you usually see.
Just be aware that its obstacle avoidance isn’t great when flying sideways or backward, meaning I’ve flown it into walls, fences, and street signs plenty of times already. But I can also report back that somehow the little guy is still working fine. I’m not suggesting that’s part of the official durability testing procedure, but it has certainly become part of mine. Now it’s my go-to drone, and I especially like bringing it on my travels for all the same reasons.

You really don’t need any of this
After a list this long, I should probably point out that you don’t actually need most of this stuff.
That’s one of the things I love about bikes. You don’t need a pile of expensive gear to have a good time. Most days, give me an e-bike, a helmet and a direction to point the front wheel, and I’m happy.
But after years of riding e-bikes professionally, recreationally, for exercise and simply to get around, these are the products that I’ve found myself continuing to use.
Sure, some of these are expensive pay-to-play things that are a lot of fun but might not be worth it for the casual rider. And some are just $1 pieces of plastic that keep me from smashing my bike computer into the pavement.
But they’ve all found their way into my life after being battle-tested… and passing!


Comments
No approved comments yet. Be the first to comment.
Leave A Reply